Sunday, 22 July 2018

chocolate brownies


Super easy Brownie Recipe,pretty much a bung it in and tadah!
Put all ingredients into a mixing bowl and mix for about two minutes, what could be simpler?
Ingredients 

1 & 1/2 cups of plain flour
1/2 cup of coco powder ( not hot chocolate)
2 cups of sugar 
1 cup of vegetable oil
4 eggs
1 teaspoon of vanilla extract 

Extras
1 cup of chocolate chips/ chopped walnuts 


But into your greased/lines tin for 30 minutes at 180 or gas mark 4.

When cooked leave to cool on a wire rack,slice and enjoy! 

These freeze great and cheap enough to make.


Cooked brownie 


Sliced and ready to devour! 
Lovely warm and gooey.😋


Monday, 25 June 2018

Cheese Scones!

 I do love a cheese scone, I mean who doesn't? Still warm off the cooling rack with lashings of proper butter, not that shite in a tub.

Here is my really simple recipe I always use for yummy cheese scones.

Ingredients

55g/2oz of real butter not the tubbed shite!
225g/8oz of self raising flour
Pinch of salt
25g/1oz of extra mature/mature cheddar cheese
150ml/5floz of milk.

Some folk add mustard powder but I cant stand mustard so I just double up on the cheese to make them really cheesey.

Method

Heat oven to 220*/gas mark 7. Rub together salt flour and butter between your fingers to a fine breadcrumb consistency, stir in the cheese, mustard if you're adding the dreadful stuff and the milk extremely gently.
Onto a floured surface tip the scone mixture out and gently mould into a large circle 3/4 inch thick, using a floured cutter cut out as many scones as you can before remoulding the mix and cutting again. Pop onto a baking tray and brush with milk, try not to get the milk to run down the sides. Into the oven for 12-15 minutes depending on your oven, take out when well risen and nicely coloured. Leave to cool on a wire rack, then slice in half and smother in proper butter!

I generally double the recipe and freeze them, only takes about an hour to defrost and they are still as fresh as out the oven ones. Scones really need to be either eaten or frozen on the same day you make them as they go stale extremely quickly.


Fresh out the oven yumminess!

Nicely risen and sliced ready for lashings of butter!

Sunday, 24 June 2018

Quick Update

Just a quicky

We have Chickens! 6 of the little Raptors and they are super cute with there own personalities.
I've neglected the blog once again but hoping to pick up the pace shortly. Its been awkward since I have to upload photos to the computer and not the laptop, its a major chew on and most of the time I cant be arsed cos I don't know what I'm doing.

I also have a new hobby which I love and is great for relaxing the mind, Rock Painting! I shall chat more about this shortly when I have more time.

Everyone is fine and dandy here and it was S' 8th Birthday yesterday,getting a big girl now!

Shall update more when I have a spare moment and get some photos on that pesky computer.

Toodles.

Friday, 18 May 2018

Seed update!


Seeds are still being sown and the originals ones have really come on in leaps and bounds, we have 4 green courgettes and 2 yellow ones which is more than enough to keep us going for the year.I foresee courgette cakes and sausage stuffed courgette boats, whole heaps of yummy delights to make with them. Those are planted and have cloches for added protection, will remove those in a week or two.

We have 65 Sweetcorn plants planted, originally sowed 81 kernels so not too shabby a result,last year we only had I think 24 plants so we should get a decent crop this year.

The sprouts have germinated well but yet to be planted out, possible job for tomorrow? Hopefully we'll have enough sprouts to last us through the autumn/winter months. I may consider popping a few more seeds in when planting out those seedlings.

Radish seeds and Beetroot seedlings are planted out so hoping those come good, will find out shortly. I will be planting more of those seeds out in a week or so we have an ongoing supply.

I need dig the patch where the Chard is going to go and sow the seeds directly into the ground. We have left it a bit late this year but being in the North East the last threat of frost isn't until the middle of May so we tend to have quite a short growing season compared to down south. We will be doing the No Dig method in Autumn ready for next year so beds are ready to plant into and its a lot less stress on the back.

We should be getting our Chickens within the next two weeks, Run and Coop will be all sorted by next weekend then its just the last little bits go get before we get the chucks! So excited more so than the kids.

There is no photos in this post as I can't find the wire for the computer which I need as you cannot upload photos straight from your phone to Blogger like you used too.
Will update with photos shortly.


Tuesday, 24 April 2018

First seeds sown of 2018!


First lot of seeds have been sown for this years food, they were of course Sweetcorn! Afters lasts years success with the sweetcorn we grew from seed it was a no brainer to try them again. So on the 8th of April we planted our seeds all 81 of them, there are 3 different verities which I cannot remember their names apart from Swift. 68 have germinated so far, which isn't too shabby but obviously I'd of liked them all to have germinated.

This year instead of using plain old compost I've gone for a proper seed sowing compost to see if its worth the extra pennies.So far I've found this one much better quality all round, barely any lumps and stones what you find in the cheap bags of compost. It's a richer texture and I've found that the seeds have germinated much quicker than using the old supermarket stuff.It is reasonably priced too at £2.75 for 10 litre.


We also are trying those little 6cm cardboard pots instead of our usual plastic tray with tiny compartments, sure you'll know the sort I mean. These cardboard ones can be planted straight outside into the final bed where the roots won't be disturbed. I did lose a few plants last year due to my heavy handedness trying to get the seedlings out the trays. These were £1 for a pack of 24 which is really cheap and I do like cheap!


S was in charge of holding the little pot while I filled them 


N was in charge of seed distribution 


Pots nicely covered in cling film and ready for nature to work its magic


We have one of those blow away greenhouse things inside our kitchen for a little extra protection, they are pretty good and do hold a better temperature then I'd achieve just having the trays on the window sill.Plus I can get more on there too.


So far we have sown,Sweetcorn,Sprouts,2 variety of Courgette and some sunflowers. Over the next few days more will be sown, not sure what yet?


The pots/trays and compost were purchased from Wilkinsons, the mini greenhouse was from Ebay. Will update in the next few days on how the seedlings are coming along.

Friday, 13 April 2018

Chocolate banana bread


This is a little tweaked recipe from the adorable Mary Berry,the rather nice Banana Loaf which is really nice and moist.I tweaked the recipe to make it into a chocolate banana loaf so that the kids will eat it,they sadly won't touch the normal banana loaf,weird kids! I also do not tell S that it has bananas in it or she will have a fit and refuse to eat it forever more. I tend to double the recipe so I can get away with not making it every week.

Ingredients for the plain banana loaf

100g softened butter
175g caster sugar
2 eggs
2 mashed ripe bananas 
225g sr flour
1 teaspoon of baking powder
2 tablespoons of milk

For the chocolate version omit 70g of flour for coco powder.
If using plain flour use 2 teaspoons of baking powder per 150g of plain flour,also add 1 teaspoon of bicarbonate of soda to the recipe.


Method

Really easy,mash banana with a fork in a large mixing bowl,add everything else and give a good mix.
Grease and line a 2LB loaf tin and put the mix in,try to get it slightly dipped in the middle so it doesn't rise too much and domes.

Bake at 180*/fan 160*/Gas mark 4 for 1 hour.
Once cooked leave in tin for 10 minutes then remove from tin onto a wire cooling rack


Not the best looking I've made but tastes good!


Sliced and ready to be wrapped for the freezer to stick into packed lunches,no need to defrost either as by lunchtime they will be perfect to eat.


Thursday, 12 April 2018

Aubergine and Tomato Curry.(Vegan)

This is a curry I tend to make for the freezer as its only me who eats it and I only buy Aubergines when they are on special offer, I do eat veggie at least twice a week and this curry is ideal as it is Vegan and low in the calories and its curry so whats not to like? The heat if you're like the rest of my family who cannot handle much more than a crappy Korma,😒 I like Vindaloos so can take it.This is not Vindaloo hot more like a nice madras heat but you can adjust the heat by using less or more Chilli powder.

Ingredients

1 large aubergine
juice of 1 lemon
oil for frying about 2 tablespoons
2 onions
4 cloves of garlic
3 inch piece of ginger
2 teaspoons of black onion seeds
1 teaspoon of cinnamon
2 teaspoons of cumin seeds
2 teaspoon of pepper
2 teaspoons of salt
2 teaspoons of garam masala
1 1/2 teaspoons of turmeric
1 teaspoon of hot chilli powder
6 fresh tomatoes but you can use a 400g tin of chopped tomatoes but fresh are nicer
big squirt of tomato puree
1 pint of boiling water
1 teaspoon of sugar


                                                                      Method

                             Chop the Aubergine into rough chunks and add the lemon juice

                              Heat the oil in a wok,add onions and gently fry for 5 minutes

                              Add all the spices,ginger,garlic and fry for another couple of minutes

                              Add tomatoes,cook for 3 minutes,add boiling water,tomato puree
           
                              Add aubergine with the lemon juice,add sugar and mix well

                              Simmer for 20 minutes until nice and soft


                                                    Chopped aubergine with lemon


                                          Spices but I've used garlic,ginger puree for ease
                                          Roughly half a teaspoon of ginger and a teaspoon of garlic


                                      Thinly sliced onions and roughly chopped tomatoes
                                    White or red onion can be used doesn't make any difference


                                          Tomatoes,onions and spices gently cooking


                                              Added aubergine and lemon juice


                                             Gently simmering away,reducing down


                                            All done! Ready for the freezer


I really could of gotten at least another portion out of this but I'm greedy and like a lot of curry,these will be labeled and frozen for future meals. I just take one out the freezer on a morning and leave on the worktop to defrost,nuke in the microwave for 3 & 1/2 minutes on high and serve with rice or on its own.

Wednesday, 11 April 2018

Soft bread buns


I have finally found a nice recipe for really soft bread buns (baps,barms,teacakes,cobs or any other terms) to me its the good old bread bun!

This recipe also can be made as a nice soft loaf.

450g Plain flour
1/2 cup of luke warm milk
1/2 cup of luke warm water
1 egg
2 Tablespoons of oil
1 teaspoon of salt
3 teaspoons of sugar 
1 sachet of dried yeast or two heaped teaspoons of fresh yeast


Mix the sugar,warm milk and fresh yeast in a cup until it activates and starts to froth,if you are using dried yeast ignore this part.

In your mixing bowl place the water,milk,yeast,sugar,egg,oil and give a little stir.
Add the flour and then the salt.
If using a machine knead for 6 minutes,by hand knead for 10 minutes.This is a damp dough so don't be tempted to add too much flour if your hand kneading.
Place the kneaded dough into a lightly oiled large bowl and cover with lightly oiled cling film for about 45 mins-1 hour.

Once the dough has risen turn out onto a floured work surface and give another knead for 2 minutes.
Shape into equalish balls and put on a baking tray,I use foil cos I'm lazy and it saves me extra washing up,just chuck the foil out at the end.
Cover with a clean tea towel and leave to rise for about 30 minutes.
Heat oven to 170* gas mark 3.Bake until nice brown colour,large buns take roughly 20 minutes small ones 15 minutes and a 2lb loaf takes roughly 30 mins.
Once out the oven put on a cooling rack to cool,don't leave on the tray as they go soggy on the bottom and nobody likes a soggy bottom!


These need to be stored in an air tight container,remember fresh bread does Not last as long as shop bought bread. These freeze well,I usually make a double batch for the week and freeze individually for packed lunches.


Friday, 6 April 2018

Italian Doughnuts


  • 4 cups of Plain Flour
  • 1/4 cup of Granulated Sugar
  • 1 cup of Milk, warmed up to about 110 degrees
  • 2-1/4 tsp of Active Dry Yeast or 5 heaped teaspoons of fresh yeast
  • 1/4 cup of Unsalted Butter, softened at room temperature
  • 2 Eggs
  •  2 tsp of Vanilla Extract


  • Granulated Sugar
  • Nutella
  • Tin of Carnation caramel
  • Teaspoon of salt.


Preparation

    1) Sprinkle the yeast and one teaspoon of sugar over the warm milk, give it a gentle stir and set aside to activate.,I used fresh yeast but I don't weigh I just use heaped teaspoons.

    2) Add the flour, sugar, salt and vanilla to the bowl of a standing mixer fitted with a paddle attachment, once the yeast is ready, add it to the flour mixture along with the butter and eggs and knead on medium speed for about 5 minutes or until your dough comes together.

    3) Roll out the dough onto a floured surface to about 1/2 inch thick, cut out your donuts using a 3” biscuit cutter then place them on a lightly floured baking sheet keep them a couple of inches apart from each other) sprinkle a little flour on top, cover with a lint free kitchen towel and place them somewhere warm to rise for about an hour and a half.  

    4) Preheat some vegetable oil in a heavy duty pan fill the pan only half way up the side with the oil) to 350 degrees, fry the donuts until golden brown on both sides, then drain them on a paper towel lined plate,quickly cover them in granulated sugar and finally fill them with nutella/salted caramel/jam using a piping bag fitted with a star tip or a new children medicine syringe.

If you don't like filled doughnuts there is always the good old ring.

For the salted caramel I heated up the caramel in a pan and added roughly 1\2 a teaspoon of Pink Salt,tasted it then added some more,repeated,1 teaspoon was ideal for our palate but its wise to gradually add the salt.You can add but you can't take it way!


This make LOTS! Ideal for school cake/biscuit sales if you want to show off a little.


    I used the lid from my Vanilla Extract bottle as I didn't have anything small enough.


Lovely Rings 


Half nutella and the rest salted caramel


Thursday, 5 April 2018

Ginger cake


Really easy Ginger cake but beware it makes loads and its the type of cake where you need a good chunk rather than a modest slice. I ended up with 2 trays as the first tray I used wouldn't hold all the mix. This also freezes fine,I quartered one of the trays to bag individually tor picnics and Leigh's bait.

I did double the amount of ground ginger as I like it really gingery but what is typed is the exact recipe,which is from the Delightful Mary Berry.This cake certainly improves with age and the next day had a sticky top like the McVitites Jamaican Ginger Cakes.

Next time I will try it without the wholemeal flour and just use Plain flour with baking powder as thats generally the flour I keep,if its not as good then I will bite the bullet and buy the wholemeal.


  • 4 tsp Ginger, ground
    2 Eggs
  • 225 g Golden syrup
  • 225 g Treacle, black
  • 225 g Muscovado sugar, light
  • 225 g Self-raising flour
  • 225 g Wholemeal self-raising flour
  • 225 g Margarine or butter
  • 300 ml Milk


160°C/325°F/Gas Mark 3.
For 50 minutes


Friday, 30 March 2018

Onion Bhaji


These not exactly the prettiest Onion Bhaji's but they sure are lovely, so much nicer than the ones from the supermarket and a damn sight cheaper to boot!
The recipe makes a decent amount about 20ish which should last a few days in the fridge in an air tight container, we like to devour them with my homemade garlic sauce or chilli sauce. Ideal as a side dish with curry or just a good lunchtime snack.


You will need;
2 large onions,thinly sliced
1/2 teaspoon of salt
2 eggs
2 teaspoons of garlic powder
4 Tablespoons of curry powder
2 teaspoons of turmeric
1 teaspoons of chilli powder
10 Tablespoons of Gram flour
Enough oil/fat for deep fat frying

Chuck it all in a large mixing bowl making sure its all incorporated, best way is to use your hand. Heat your oil or fat to roughly 350* Drop a spoonful of the mix into the hot fat then as soon as it pops up to the top put another one in,dont over crowd them. Cook for roughly 2 minutes on each side till a nice golden brown colour, drain on kitchen paper. Then feast on those suckers!

Quick garlic sauce recipe I use;

1 level teaspoon of garlic powder
1/2 teaspoon of garlic paste
good sprinkle of dried parsley
2 heaped tablespoons of full fat greek yoghurt
2 heaped tablespoons of full fat mayonnaise

Chuck all in a bowl and give a good mix, taste and add more garlic if needed.

Quick chilli sauce recipe;

5 Tablespoons of tomato sauce/ketchup
1 teaspoon of mint sauce
1/2 teaspoon of chilli powder (adjust to taste)
Touch of water to thin slightly

Mix all together, easy as that.

Saturday, 24 March 2018

Name Change

Well R has decided that she no longer likes her birth name and has changed it completely by Deed Poll,so now I will be referring to her as Iz on the blog.

I should of changed my name to something less nutty,I mean who looks at their newborn and thinks Hazel is a fab name for you kidda with your little round head shaped just like a nut.


Friday, 23 March 2018

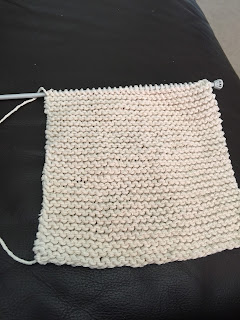
Dishcloths,homemade of course!

I have been making my own dishcloths for a couple of years now, they are made from 100% cotton string,I use size 4 needles. I source my string from the cheap shops which works out at 3 dishcloths for less than £1,the quality is far more superior than any dishcloth I have purchased out of a shop.
As they are made from cotton the can survive a boil wash if needed and they are incredibly strong, I still have the very first one I made which is still in great condition.

They are really easy to make,I just cast on roughly 30 stitches and continue to knit until the ball of string is finished, beauty about making them yourself is that you can have them at the size you prefer.I don't like the large shop bought square cloths what hole within a month of usage, they just don't wash well.

They can be dyed if you're one of those colour coordinated folk, me, I can't be arsed when its only for washing the pots, if it was on display and I had lots of visitors then I may consider it.Consider it then still think 'nah' its a dishcloth.


Here is a little piccy of a dishcloth nearly completed.


It only takes me an hour from start to finish as I'm a slow knitter and you'll never run out of dishcloths unless you forget to buy string.


Completed Dishcloth


Thursday, 15 March 2018

Leigh's pickles


Pickled Cucumbers,not my kind of pickle personally but Leigh loves these.Really easy and cheap to do, he used an empty Lidl Gherkin jar which are pretty big and used the leftover pickle juice from the Gherkins and topped up with extra white vinegar.He sliced chilli peppers and a few sprigs of dill along with his thick slices of cucumbers. These about a couple of months old now and he says they are tremendous!

I'm a fussy sod and only like sweet sliver skin pickled onions or beetroot.

He does a similar thing with picked eggs, saves the jars and the reuses the leftover vinegar. I've never actually tried a pickled egg but I may do one day.

Slurping the pickle juice is a great cure for heartburn/indigestion and good for replacing electrolytes when you're feeling a little run down.

Tuesday, 23 January 2018

Leigh's home brew


Just take a moment to admire that home brew...........................This is a Pale Ale,Leigh's first attempt at making his own booze and holy crap on a cracker its lovely! He purchased a home brewing kit off Ebay what has the fancy clear brewing bucket and other crap I have no idea about even though he's told me plenty of times.
This particular brew was a kit from Wilkinsons for the grand price of £12,kit had everything needed to make 40 pints,40 pints of Pale Ale for £12! Unbelievable and it only takes 21 days to do whatever home brew stuff does, ferment and shit? I do say shit a lot,mainly it means things and stuff.

Anyhow the taste is the important thing, years ago I can remember drinking home brew and it either tasted what I imagine cat piss to taste like or it was so nasty and strong you couldn't bare more than a sip and a smile as not to offend the maker but damn that stuff was crap.
These days its smooth and glorious and a pleasure to drink,I personally don't really like Lager I'm more of a beer or Spirit drinker on the rare occasion I do have a tipple.

This particular brew tasted like a Lager that was trying really hard to be a beer/ale but just wasn't quite there yet. It was surprisingly nice and for £12 for 40 pints you cant go wrong.L liked it as his first try at home brewing and was impressed as equally I was by his first attempt but he was looking for more a beer than a lager.

He sourced other beer kits which have a higher price tag but WOW these are proper beers,I will have to do another post about which ones he did and his verdict and photos another time as L is at work and I can never remember even what they are called.


But this Wilkinsons IPA home brewing kit for £12 is highly recommended as a cheap taster kit if you fancy having a go at saving yourself a fortune if you like a tipple.


Monday, 22 January 2018

Crappy Christmas and New Year.

Sadly Christmas 2017 was utter shite!

It was full of Vomit and the dreaded Lurgy, S had started feeling poorly the week before Christmas then of course it spread to the rest of us within days. We all had mild cold symptoms but the post nasal drip was rotten, full of snot on the chest, coughing up big mouthfuls of slime. We were literally drained of energy and barely made it out of bed on Christmas morning, everyone just felt like crap.

Then S was trying to open presents whilst puking all over the carpet, not great. I didn't even bother making a Christmas dinner, nobody had an appetite so we managed a slice of chicken and about 3 sprouts each and even that was a struggle.

Over the course of the week we were all having bouts of vomiting,the chesty cough kept setting my Asthma off so I was practically glued to my inhaler.We all just couldn't be arsed to do anything,still not eating properly and only R managed to eat a bit of chocolate.
No chocolate at Christmas is unheard of in our house, possibly unheard of any day of the week actually.


Then New Years Day came round and I took a turn for the worst, my Asthma was out of control and 111 wanted to send me an ambulance, decided L could get me to hospital quicker so off we went.
5 hours and a chest x ray later I came home with Antibiotics for a chest infection.
Those AntiBs didn't really help but and gave me the pukes and squirts so off to the docs after a few days to see if I could change them to something else and was given some Steroids.Those seemed to help more but was only for a 7 day course,I have now been put on a preventative inhaler which has been helping.We are now 3 weeks into January and I still have a chesty cough which occasionally makes me sick also that nasal drip but thats starting to clear.Everyone else has been fine for about 2 weeks jammy beggars,I think mine has lasted so long as I have Asthma and 2 Auto Immune diseases.


I'm on the mend now, possibly 85% better which is pretty good and I have a decent level of energy which I need as the house still needs the chores doing and the family won't feed themselves.
Hopefully by the next few weeks I'll be back to 100% which I need to be so I can plan for the gardens to be prepped  ready for the growing season.


I will try to keep up with this blogging lark but no promises 😀

Wednesday, 1 November 2017

M.I.A

Currently we are decorating the kitchen,YIPPEE!

It was last decorated just before our wedding back in 2013,it was a dreadful yellow which wasn't a decent shade and we have double arches which were painted a hideous orange colour what I mixed myself as I couldn't find anything I liked.It sucks when you have shitty eyes what don't see colours the way others do as you tend to get some disasters with things clashing or just are simply horrendous.

Anyhow we are roughly about a 1/6 of the way through it now, when I say "we" I actually mean Leigh as he's been doing it, all I've done it paint 4 doors basically.Oh nearly forgot that I painted all the cupboards, we went from that shitty light brown wood colour to Duck Egg Blue on the bottom cupboards and Crushed Almond for the wall cupboards.I used Wilkinsons cupboard paint which was a dream to use and went on very well with a little gloss roller, highly recommend the stuff.


So Leigh is currently doing the wallpapering which is a start/stop affair as he works full time and the little kids torture him on a weekend.We are hoping it'll be finished in the next couple of weeks.

Posts on here will be scattered about as they basically are now but I will post when I have time/remember!

Saturday, 7 October 2017

Bargain of the week!

This weeks bargain is 7 bottles of this lovely shampoo for £1.40! Thats right your maths is correct they work out at 20p each. I have seen them in Asda selling for £4 and home bargains for £3.49,I got these off the reduced items end of aisle shelf in Asda.There was only these 7 bottles so yeah I was greedy and took them all, no fucks given!


It's a really good shampoo and smells lovely, it is for blonde hair which I don't have but I have two blondes and two gingers what will use it.It has those illuminating thingies in it what make your blonde hairs more vibrant, cant say I've noticed any difference in the kids hair after two washes with it.My hair is dyed due to the dreaded Grey hairs so I reckon this would fade and strip the dye out much quicker than just my regular shampoo.I only use 28 wash out hair dyes, so I'll only have to buy shampoo for my usage over the next few months.Hurrah!


It's always worth checking out the sin bin/bargain basement/reduced shelf for a good bargain, its not all dented tins and taped up washing powder boxes.

Hazel

Tuesday, 3 October 2017

Sweetcorn Harvest!

Wow! I was totally amazed by how well the sweetcorn turn out,I was expecting maybe two full cobs and not a great deal of anything else.They were planted out late in the planting season so that was the biggest mistake I made,I'm positive that if they had been started off and planted out a month earlier I would of have even more success but what I did harvest was fantastic.

So next year I shall be doubling the amount of seeds started and a lot earlier, will also need to prep the area of the garden where I will be planting. I can use the same space I used this year and just extend it as sweetcorn is a crop where you don't have to be so concerned about crop rotation. I have already bought my sweetcorn seeds from Wilkinsons in the sale, there is 3 varieties which I cannot remember and I'm too lazy to get off the sofa and have a look.I'm not concerned about cross pollination so there will be no need to mess about covering the individual tassels with a paper bag.


Harvested cobs fresh from the plant, complete with a few spiders and earwigs!


Husks removed,those are some delicious yummy kernels!


S and N ate a couple of cobs raw which were only partly pollinated and didn't have many kernels on them, they couldn't wait to chop on them.Didn't even rinse them under the tap,soon as the husks were peeled off they devoured them.They are super sweet and fresh completely different to what I've had from the supermarkets.All the cobs have now been washed, bagged and in the freezer ready for use.

Roll on next year for hopefully a bumper crop.

Hazel.

Thursday, 21 September 2017

Busy Busy Busy

Haven't looked at the blog for a while now as I am forever distracted, suppose thats what happens when you have a home to manage and kids to look after.
At the moment we are slowly decorating the kitchen,I've been on painting whitework duty which I hate I might add!
We need to get some more tiles around the cooker to extend them up to the coving, then theres the ceiling to paint a couple of times,the boiler to tidy up as some of the white paint has chipped off and rusted.It basically looks a mess the whole kitchen and I cannot stand the crappy yellow and orange painted walls, why I decided on those colours I'll never know? I know why because I wanted to cover the shitty brown colour what was here when we moved in.It was the colour of poo,hideous! At least I know someone has worst taste in decor than me.

It will be all done shortly, its just finding the time and the energy to do it.


Gunna finally harvest the sweetcorn we've been growing tomorrow so hopefully I'll add photos to the draft post I've already done and get that published by the end of the week.

Saturday, 2 September 2017

My oven is fixed!

Thankfully Leigh had a tinker with the back of the oven and messed about with some wires and clips and hey presto my oven now works!
I'm so pleased,I've been lost without it as its a huge oven and I can do some great batch cooking in there without waiting around for one little tray of stuff to cook before I pop the next one in.I had been using the oven program on my microwave so you can imagine the size of space I had.Most of my baking trays didn't even fit so it wasn't suitable for the long term but I managed for those few weeks when needed.

Hopefully this time the oven continues to work like a dream.

Leigh made homemade Samosa

 Last week Leigh made some keema samosa's which were delicious and pretty easy to make.He used a simple keema recipe with added peas and boiled potatoes,Google is great for recipes but I've found Facebook groups are also very good for authentic recipes.Just search for Indian cooking/recipes and there is lots of groups what love to share and encourage others to cook in a more traditional way.


                                                         Keema recipe
                                                         
                                                  2 Tablespoons of vegetable oil
                                                  1 pound of onions, sliced
                                                  2 teaspoons of salt
                                                  2 teaspoons of pepper
                                                  1/2 teaspoon of ground cumin
                                                  2 teaspoons of garam masala
                                                  pinch of ground cinnamon
                                                  1 1/2 teaspoons of hot chilli powder
                             1 pound of minced lamb (any minced meat can be subbed)
                           2 medium potatoes chopped into small squares, boiled till tender
                                                  1 large handfuls of frozen peas


Heat the oil in a wok or large frying pan, add the onions and fry till golden brown and tender, add salt, pepper,cumin,garam masala, cinnamon and the chilli powder for 2 minutes.Add the mince and gently fry for 20 minutes on a low heated not drain and stir occasionally so it doesn't stick to the bottom of the pan.Add the cooked potatoes and frozen peas and carefully stir into the mince mix and cook for 1 minute.Remove from heat and let it cool down before assembling the pastry cones.


The Samoas dough is a very simple pastry

250g Plain Flour
1 teaspoon of salt
2 teaspoons of vegetable oil
1 egg, separated 
9 tablespoons of warm water


Mix the flour with the salt in a bowl, work in the oil and egg yolk with your fingers until it resembles breadcrumbs.(egg white needed later so don't ditch it) 
Mix the warm water gradually into the flour for a stiff unsticky dough, you may need a dip more water depending on your flour.Wrap the dough in cling film and chill in the fridge for 30 mins.


 Pastry should be rolled out thinly to about 3-4mm,take a side plate and place onto rolled out pastry and cut round it to for an even circle, cut this in half.Take one half and make a cone, make sure the edges are closed well, we used the egg white as a glue as well as pressing the edges together to seal.Spoon the filling into the cone but don't over fill you need about a 1/4 space.Brush the top edge again with the egg white glue and firmly press to seal.It is important to have a good seal on all the open edges so they don't break apart when deep frying.


Sealed Samosa's can now be deep fried on a medium heat for about 5 minutes until golden brown, drain on some kitchen roll for rid of excess grease and then enjoy!

These are good in the fridge for about 3 days but they never last that long here, we like them hot but also they are ideal for picnics/packed lunch. You can choose many different fillings, could even do a sweet fruity version.


    nom nom

Tuesday, 29 August 2017

Sweetcorn!

First time growing Sweetcorn this year and WOW its amazing! Food from a little seed with just some dirt,water,sun and a little love.

I planted 30 seeds which 25 germinated,Leigh accidentally chopped one down when he was trimming the grass so we now have 24 really healthy looking plants.
I have spent time each dry morning pollenating them once they grew the tassels and silks, so hopefully they will be full of kernels with no large gaps.
Each slik thread is a little corn kernel so its important to help with the pollination rather than totally rely on the wind.Sweetcorn is wind pollenated so no benefit to the bees sadly but it has amused me to get out there and pollenate.The spiders love hiding in there, those funny looking ones with the large ball shaped bodies and massive long legs.Luckily spiders don't bother me but I do hate it when I find an Earwig,cant stand those things and will happily stamp on them,Ewwww


A few photos at different stages, sadly I didn't take any photos when they were really small.


Growing stronger by the day


Complete with tassels and silks


Silks waiting to be pollenated 


Close up of the silks


                                                       Ripening ear of corn


Hoping to harvest a couple in the next few weeks,I'm glad they have grown at different rates as I can lengthen the harvest time without having to freeze a load in one go.
This is something we will definitely be doing again and possibly twice the amount.